Featured Post Today
print this page
Latest Post

How to create EXE files with WinRAR

For some people, it is very difficult to create EXE files fromWinRAR. This article will duide you the way to create EXE files fromWinrar easily
You want to compress files into an EXE file with WinRAR in order to extract it on the other computers more easily. However, you do not know how to open this feature. This article will guide you the way to open as well as use this unique function of WinRAR.


Step 1: After installing  WinRAR, open the program by one of following methods
- Method 1: Click on the software icon on Desktop (if you agreed to create the shortcut on Desktop in the install process).

- Method 2: Click on Start (at the bottom left corner of the screen). In the Search Programs and files section, enter the Winrar keyword, then the results will be displayed right on the screen. Click on the search result for "Winrar" to open the program.
- If your computer uses Win Xp operating system, you can open the program through the Run function which is "c://programfiles/Winrar/Winrar.exe"
- Method 3: More simply, choose the folder you want to compress, then right click and move the mouse to Add to Archive.
Step 2: After selecting  Add to Archive, a window will appear so that you set up the archiving mode. At this window, enter name of the compressed file on the box below Archive name or you can use the default file name.
Next, tick on the square beside Create SFXArchive so that the compressed file has the EXE format.

After selecting Create SFX Archive, the compression file format will be changed from RAR or ZIP to EXE as in the picture.
Next, click OK to move to compress the file. After the compression process is completed, your compressed file will be as follow.
Compressing the files to an EXE file will help your compressed file become an executable file. This file will automatically extract even when your computer does not have the tool for extracting like Winrar, WinZip. Besides, this format is also easy-to-use for those who are inexperienced in compressing and extracting files with Winrar and Winzip.
Wish you success!
0 comments

Top 5 programs for editing and reading *.exe files

It can be said that it is difficult and challenging to find programs for reading and editing *.exe. Therefore, top 5 programs to read and edit *.exe files below will be really helpful for you.
It can be said that *.exe file is a familiar format to lots of users. Especially, those who have to read and edit this will be very interested in programs below.

The programs for reading and editing *.exe files is very popular and used by lots of people, thus, they will be very helpful for you.


1. Resource Hacker

It is common that you frequently see *.exe file while using computer. Resource Hacker is a program that is used for not only editing *.exe but also *. Dll, *. Ocx, *. Scr, *. Cpl. Editing * exe will be greatly simplified with the help of Resource Hacker.
2.Akala EXE Lock

It can be said that this software can encrypt all files on your computer. This software can block or modify an exe file on your computer without affecting such files storing your personal information. Information and data *.exe are also be secured by Akala EXE Lock strongly and thoroughly. You will not hesitate when using this software thanks to its powerful and useful features.
3.ExeScope

This is a program that allows you to display and analyze, and more specifically, to read and modify *.exe. It also replaces some applications in Windows.
4. Exe Wrapper

This is a program that is compatible with popular operating systems of Windows. This software can protect *. exe password. Moreover, Exe Wrapper can change the icon of *.exe. The osftware’s interface is simple and easy to use.
5. ResEditTools

It is one of the programs that can change such structural file as *.exe and*. Dll, *. Ocx, *. Scr, *. Cpl. ResEditTools is a specialized program used to decode and change all structural files. This software is often used to Vietnamize programs. Especially, you can add, delete, view, rename, change existing resources in files.
 
0 comments

6 Ways to launch Command Prompt on Windows 7

You just know how to open the Command Prompt (formerly known as MS DOS) on Windows XP and other older versions of Windows but not in Windows 7? 
On the current market, there are lots of Internet software supporting command line to manipulate on the Command Prompt window instead of manipulating on normal desktop. If you are a computer expert or a professional programmer, you have to use command line frequently.


* Option 1: Use the Search tool.
This is a popular way used by lots of people. Just click Start Menu - > type Command Prompt into Search Programs and Files - >Open Command Prompt in Programs
* Option 2: Run the program from Run.
Unlike Windows XP, Run window is installed on the Start Menu in Windows 7. Just do a search like the above method with Run keyword in Search Programs and Files (or the fastest way is to use the Windows + R).
Type”cmd”or”cmd.exe”in Run - >OK or Enter.
* Option 3: Boot from the Start Menu
Click Start Menu - >All Programs - > Accessories - >Command Prompt
* Option 4: Create the Command Prompt shortcut on your desktop.
Previously, betdownload.com showed you how to create a Facebook icon on the Desktop, you can also do the same when creating the Command Prompt icon.
Right-click on any location on the Desktop - > New - >Shortcut
Create Shortcut window opens, choose the path to cmd.exe file by clicking Browser. This executable file is located in the folder C:\Windows\System32->OK
Click Next to continue
In the Type a name for this shortcut: Type a name for the shortcut you want to use - >Finish to close the setting.
Done! Now every time you start your computer, to log into the Command Prompt window, just click on this icon.
* Method 5: Set the Command Prompt shortcut on the Taskbar
If you do not want to create shortcut icons on the screen as method 4, you can to pin this shortcut under taskbar, hold the Command Prompt icon and drop into the Taskbar.
* Method 6: Boot from the Windows Explorer
Right-click the Start Menu - >Open Windows Explorer.
Access to the path containing cmd.exe(C:\Windows\System32). Enable execute file cmd.exe to open Command Prompt.
Conclusion: As you can see, opening  Command Prompt is not merely conducted in a unique way, on Win 7 you can open this window by 6 different ways. You just select the easiest way to open Command Prompt, or if you know how other additional way, please share with we!
 
0 comments

Turn off shadows under window in Windows 7

Shadows under window in Win 7 often bothers user when they want to take screenshot. Because that shadow appears around the picture user want to take screenshot. Is there any way to remove this shadow?


When using FastStone Capture software to take screenshot, shadow often appears around the area you want to take a screenshot and make the picture look bad.


Step 1: Go to Start/Control Panel and type visual effects in Search on the top right of the screen

A window appears, select

Select ”Adjust the appearance and performance of windows” of System
Step 2: A window appears, in Visual Effects, uncheck Show shadows under windows
And here is the result.

Before changing:
After changing:
With just a few simple manipulations, the article above has guided you how to turn off shadow under window in Windows 7 to help you eliminate shadow around screenshot. Hopefully, these little tricks will be helpful you.
0 comments

How to take screenshot on Samsung mobiles

At present, the demand for viewing photos on the Internet has become more and more prevalent and when surfing web with mobiles, you want to set them as wallpaper. There is a very simple and effective method – taking screenshot.


In this article, we only mention about Android devices of Samsung.

Devices with physical home button

Many smart phones of Samsung have physical Home button, you can press Home and Power button combination to take screenshot. By pressing the two buttons until the screen edge flashing, you will hear the capturing sound. You will receive the notification that screenshot has been taken and saved in image format.
Devices with no physical home button

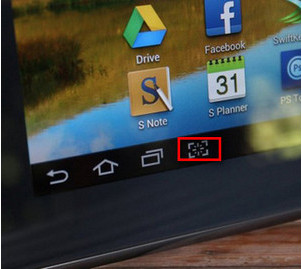
Some devices of Samsung (e.g. Galaxy Note 10.1 and Galaxy Camera) do not have physical home button. Let’s use Power and volume down button combination, hold the two buttons until the device takes screenshot.
Some devices such as Galaxy Note 10.1 have a quick start button which can be set to take screenshot. On Galaxy Note 10.1, this quick start button is besides the Multitasking button on the virtual navigation bar.
Devices with S Pen button

On Samsung devices with S Pen button such as Galaxy Note, you can use S Pen button to take screenshot. You only need to press and hold S Pen button, and then touch the top of the pen on the screen until the entire screen flashes.
Normally, when taking screenshot with S pen, the photo will be opened immediately for users to edit. Remember to save the photo after editing.

Devices supporting hand moves

Many smart phones of Samsung such as galaxy S3 and galaxy s4 also allow taking screenshot by clawing the hand on the screen of the device. To use this method, enter Settings >Motion, activate "Palm swipe to capture".
Therefore, we have instructed you how to take screenshot on Android devices of Samsung. Hope that you can work well with this feature and have beautiful photos.
0 comments

Restore original settings with Samsung Galaxy S5

You are using a Galaxy S5 and keen on hacking it. However, it is unexpected that you have forgot the password or simply want to put it into the original state. In this article, we will help you restore the original state of your mobiles when you set protected password with your finger print.
The restoration of Galaxy S5, in fact, is not as difficult as many people may think. Firstly, to ensure that all your data are safe, you need to move your data to your memory card or PC and keep your mobile’s battery level always above 50%.

You can use two following methods:


Method 1: Restore original settings

This method is only applicable when you are still able to manipulate on the touch screen of the mobile and will have no effect when your mobile is suspended or you lose password for logging in to the mobile.

1. Enter Setting by dragging the Notifications bar, select the symbol of Setting which is the gear symbol as in the image.
2. In USER AND BACKUP section, select Backup and reset
3. Next, in PERSONAL DATA section, select Factory data reset.
In addition, you can also type *2767*3855# to restore the original setting for Samsung Galaxy S5.

Method 2: Hard reset

For mobile with forgotten password (including both touch screen and figure print) or suspended logo and fail to restart, you need to use this method.

- Firstly, turn off your mobile or remove and reinstall the battery.

- Use button combination: Simultenously press and hold 3 buttons Home + Power and Volume Up and wait for Hard Reset screen to be displayed.

- Continue to use Volume button and move up and down to select Wipe data/Factory reset and press Power button to select.

- Afterward, select YES -- delete all user data and continue to press Power button. Your mobile will restore the original setting of your mobile and return its initial state.

Therefore, through the two above common methods, you can restore the original settings for your Samsung Galaxy S5. In the usage process, if you see that your mobile is suspended or too slow, you can use the two above methods to restore the original settings for your mobile.
0 comments

Resize Video subtitles in KMPlayer

KMPlayer helps you watch Videos in different formats, even videos having subtitles and high-quality ones. Besides entertainment features like listening to music, watching movies, KMPlayer also allows you to resize video subtitles to suit your eyes.
On this article, Betdownload.com will guide you the way to do this. Note: KMPlayer just can change Videos having removable subtitles ( means 1 video file and 1 subtitle file), not Videos having the fixed subtitles (means subtitles are existing).


Step 1: Run KMPlayer and open the Video you want to watch.
Step 2: To resize subtitles of Videos, you just need right click on any position on the interface of KMPlayer.

A dialog box will appear, select Subtitles to resize subtitles. From Subtitles, choose one of options at the end of the box:

- Font Size Increase (Alt+F1): Increase the font size
- Font Size Decrease (Alt+F2): Decrease the font size
- Font Size Reset (Alt+F3): Use this mode to return to the default font size.


The size of Video subtitles before and after it is changed :


Thanks to this feature, your eyes will accommodate better when you do not have to watch Videos having too small or too large fonts.

Wish you success!
 
3 comments
 
Support : Creating Website | Johny Template | Mas Template
Copyright © 2011. Document Information - All Rights Reserved
Template Created by Creating Website Published by Mas Template
Proudly powered by Blogger